Multimédia center with Raspberry Pi 3
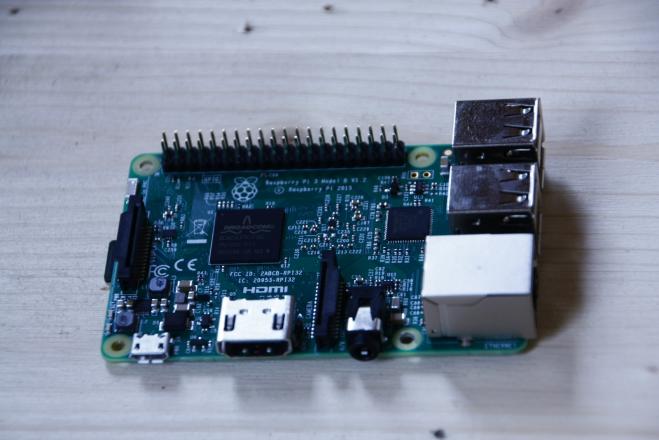
Raspberry has a very low consumption, so it can be a cheap media-center that can display your photos and of course play your favorite music. As Raspberry use SD card, I store my medias on a NAS.
Il faut
- Raspberry Pi 3,
- a NAS to store your music, films and pictures.
Sources
The best Multimedia center I've tried is KODI, so I will install an configure it for this project.
For a short and easy install solution, I will install OSMC. It is based on Debian, which means that it has over 30,000 packages available in its repositories which makes it very expansive.
Install
Regarding to your OS, get the last version installer on the page https://osmc.tv/download/ and start it with a double click.
Don't forget to turn on SSH acces during the install process. The befault login is osmc and password is osmc.
Configure OSMC
That the easy part : everything is done ! Enjoy.
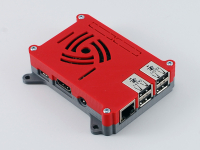
Making a box for your Raspberry Pi 3
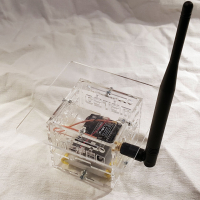
You can grab the box I used for this raspberry here : http://www.thingiverse.com/thing:922740

Automate poweroff
By default crontab is not install on the raspberry Pi.
Install crontab, and edit a cronjob for root :
sudo apt-get update
sudo apt-get install cron
sudo crontab -e
Create the job (for root) :
# -------------------------------------------
# arret de la machine de dimanche a vendredi
30 20 * * 0-5 /sbin/shutdown -h now
# arret de la machine les samedis
30 23 * * 6 /sbin/shutdown -h now
Now, your raspberry will poweroff (shutdown) at 20:30 from sunday to friday and at 23:30 on saturday
Add your media folder from your NAS in OSMC
OSMC can browse content from a Samba share, this is what we need to add our medias from a NAS.
In OSMC program, go to :
- Music / Médiathèque / Files / Add source
- Click on the browse button
- Choose : Windows network (SMB)
- Browse your network and select the music directory on your NAS.
- Ok
- Update your database

Synchronise your pictures from owncloud
There are some APPS for smartphone that can automatically upload all your photos to your account on your owncloud.
Installing Owncloud on centos 7
Add repo to yum and install :
cd /etc/yum.repos.d/wget http://download.opensuse.org/repositories/isv:<span class="search_hit">ownCloud</span>:community/CentOS_CentOS-7/isv:<span class="search_hit">ownCloud</span>:community.repoyum install <span class="search_hit">owncloud</span>cd /var/www/html/chown -R apache.apache <span class="search_hit">owncloud</span>/
Install Apache and Mariadb :
yum install httpd php php-mysql mariadb-server mariadb sqlite php-dom php-mbstring php-gd php-pdo
If you have selinux, you must give right to write data :
setsebool -P httpd_unified 1
Open the firewall for Apache :
firewall-cmd --permanent --zone=public --add-service=httpfirewall-cmd --permanent --zone=public --add-service=httpsfirewall-cmd --reload
Start Apache and MariaDB :
systemctl start httpd.servicesystemctl start mariadb.service
systemctl enable httpd.servicesystemctl enable mariadb.service
Create the mariadb data base :
mysql -u root -pcreate database <span class="search_hit">owncloud</span>;grant all on <span class="search_hit">owncloud</span>.* to 'clouddbuser'@'localhost' identified by '<yourPassword>';quit
Apache settings :
vi /etc/httpd/conf.d/<span class="search_hit">owncloud</span>.conf
#<IfModule mod_alias.c># Alias /<span class="search_hit">owncloud</span> "/var/www/html/<span class="search_hit">owncloud</span>/"#</IfModule> <Directory "/var/www/html/<span class="search_hit">owncloud</span>"> Options Indexes FollowSymLinks AllowOverride All Order allow,deny allow from all</Directory>
Restart Apache :
systemctl restart httpd.service
Install APPS on your smartphone
I use ocloud for Android wich work silently. You can found it here on Google play
Configure OSMC to grabb your photo from your owncloud
I use a rsync command from the Raspberry and my owncloud server.
You need to define a SSH key from the osmc default user :
sudo apt-get install ssh
ssh-keygen -t dsa -b 1024 -f ~/.ssh/cloud
Transfer the public key to the remote server :
ssh-copy-id -i ~/.ssh/cloud YourRemoteUserInOwncloudServer@YourOwncloudServerName
And the rsync command that you have to run in a cron job every 10 minutes (This rsync, will copy a remote directory /data/owncloud/YourRemoteUserInOwncloudServer/files/InstantUpload/ content to the local directory /home/osmc/cloud/)
rsync -avz -e "ssh -i /home/osmc/.ssh/cloud" YourRemoteUserInOwncloudServer@YourOwncloudServerName:/data/owncloud/YourRemoteUserInOwncloudServer/files/InstantUpload/ /home/osmc/Pictures/
Install a screen saver to display your photos
There are so many screen saver that you can use in OSMC...
In the settings of the screensaver, you just have to define the source folder as /home/osmc/Pictures and enjoy.
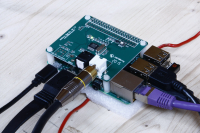
HIFI with the Raspberry Pi 3
As I plane to use my Raspberry as a multimedia center and as I'm a music lover, I need more quality.
Il faut
- Raspberry Pi 3
- HifiBerry
I look for a good solution to output a nice music quality from my Raspberry Pi 3. So I don't want a software correction or something similar, I realy need an hardware solution.
On this page I describe the solution I tried (?) and the other I've found on the web.
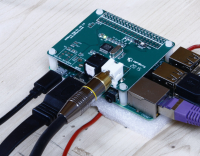
HIFIBerry : Digi+
Standard version : €24.90
The HiFiBerry Digi+ is a high-quality S/PDIF output board for the Raspberry Pi model A+/B+, Raspberry Pi 2 and 3.
- Dedicated S/PDIF interface chip supports up to 192kHz/24bit resolution
- Optical (Toslink) and electrical outputs
- Bit-perfect output, audio data stream will not be modified in any way
- Connects directly to the Raspberry Pi, no additional cables needed
- No soldering. The Digi+ comes as a pre-fabricated kit. You just plug it onto the Raspberry Pi B+. The board conform to the Raspberry Pi hardware-attached-on-top (HAT) specification. That means it perfectly fits your Raspberry Pi B+.
- Directly powered from the Raspberry Pi, no additional power supply
- Optional: high-bandwidth output transformer provides full galvanic isolation of the electrical output (not in the standard version)
-
Integrated EEPROM for automatic configuration (with write-protection).
Note that this feature is still in development by the Raspberry Pi foundation. You will be able to upgrade your HiFiBerry DAC+ when it is officially available. The sound card already works without this feature. - Comes with all components required to mount it. We include 4 M2.5x12mm spacers to fix the board onto the Raspberry Pi.
Mamboberry HiFi DAC
€89.90
The MAMBOBERRY HiFi DAC+ is a high-resolution digital-to-analog converter(DAC) for the Raspberry Pi models A+/B+ and 2B/Zero/Pi 3.
Specially designed to deliver the best audio playback quality, and also an ultra low power supply ! with 1A power ability, for the Raspberry Pi models.
My choice
I didn't test the Mamboberry as it is a DAC, but the HifiBerry is a very good solution and give me the quality I was looking for.
Configuration
The HifiBerry is very simple to plug and comes with all the screws you need to be attach on the Raspberry card. By default the HifiBerry card use all the Gpio ports, so if you need some, you have to extends the card for that.
Under OSMC, you have to specify the new output card.
- In System > "My OSMC" > PI config > hardware support > soudcard overlay : hifiberry-digital-overlay
- w1gpio : none
- Reboot
- Done

Mettre le système raspian en français
Afficher les information de l’environnement local :
locale
Pour avoir les information de localisation disponible sur le système :
locale -a
Mettre le système courant en français :
export LANG=fr_FR.UTF-8
sudo vi /etc/default/locale
et rajouter :
LANG="fr_FR.UTF-8"
on applique les changements et on reboot :
sudo update-locale
sudo reboot
Autre solution
sudo dpkg-reconfigure locales
Extinction de l'écran avec le Raspberry Pi
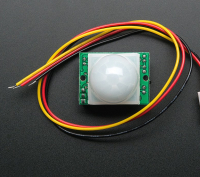
Pour cela on va utiliser un détecteur PIR et un relais pour couper l'alimentation de l'écran.
Il faut
- Capteur PIR
- Relais
- Raspberry Pi 3
Câblage
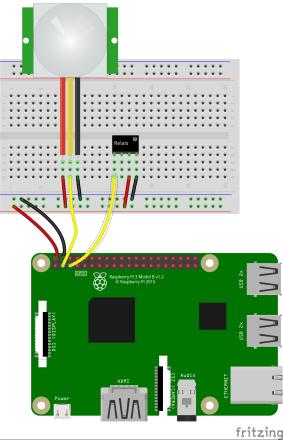
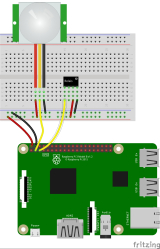
Câblage d'un capteur PIR et d'un Relais sur la raspberry Pi
Programme Python
Installation de l'environnement python (optionnel)
Plus exactement, de la dernière version de développement de Python et des paquets nécessaire (PGIO) en utilisant PIP :
sudo apt-get update
sudo apt-get install python-pip python-dev gcc
sudo pip install rpi.gpio
Le programme Python
Sur la pin 5 on branche le SIGnal du relais et sur la 11 le SIGnal du PIR.
Dans un fichier pirdetection.py écrire :
import RPi.GPIO as GPIO
import time
PinPIR = 11
PinRelay = 5
GPIO.setwarnings(False)
GPIO.setmode(GPIO.BOARD)
GPIO.setup(PinPIR, GPIO.IN) #Read output from PIR motion sensor
GPIO.setup(PinRelay, GPIO.OUT)
while True:
i=GPIO.input(PinPIR) # Lecture de l'etat du PIR
if i==0:
GPIO.output(PinRelay, i) #Extinction de l'ecran
time.sleep(0.1)
elif i==1: #When output from motion sensor is HIGH
GPIO.output(PinRelay, i) #Allumage de l'ecran
time.sleep(60 * 10) # Wait for 10 minutes
Il faut maintenant que ce script Python soit exécuté en tâche de fond à chaque démarrage de la Raspberry. Pour cela :
sudo crontab -e
et rajouter en fin de fichier :
@reboot sudo python /home/pi/pirdetection.py > ~/pirdetection.log


